
Grungy Metal Text Effect in Photoshop In today’s quick tip tutorial, we will demonstrate how to create a futuristic, grungy, text effect with lots of scratches and fancy neon lights. Let’s get started!
Grungy Metal Text Effect in Photoshop

In today’s quick tip tutorial, we will demonstrate how to create a futuristic, grungy, text effect with lots of scratches and fancy neon lights. Let’s get started!
Step 1
Create a new document.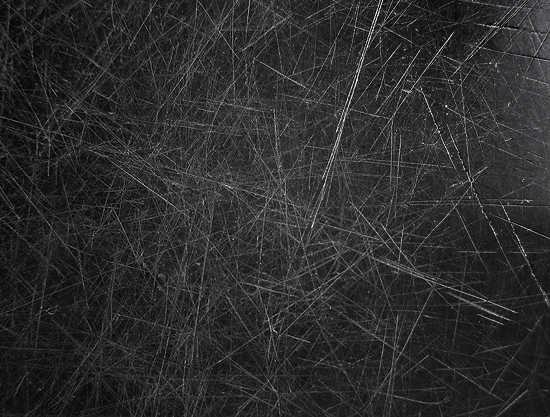
Create a new document.

Step 2
Let's get started with the text. Write the text of your choice and center it on the screen. In this case I wrote "TUTORIAL" with the ARIAL font.
Let's get started with the text. Write the text of your choice and center it on the screen. In this case I wrote "TUTORIAL" with the ARIAL font.

Step 3
Next, apply these layer styles. You can mess around with the colors to get the effect and tone you wish to achieve.

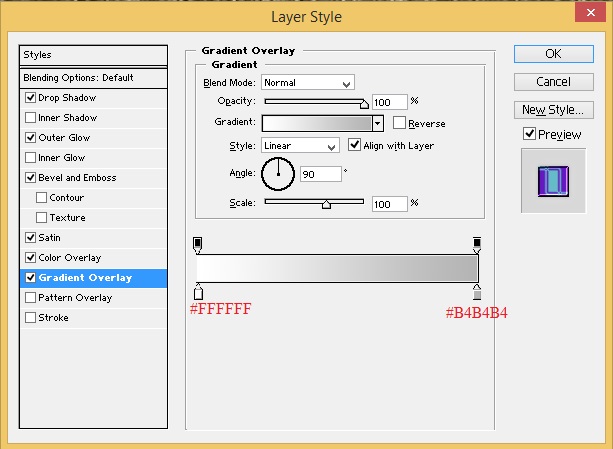

Step 4
Next, apply these layer styles. You can mess around with the colors to get the effect and tone you wish to achieve.


Step 4
Once you're satisfied with the results, it's time to add the neon lights. Select the Shape Tool (U) and pick the Rounded Rectangle. Set the corner radius to 2px and draw this shape somewhere inside the long parts letters, making sure it is half the width of the area you're placing it. And make sure not to cover the ends of the letters, as we still need to add screws there.
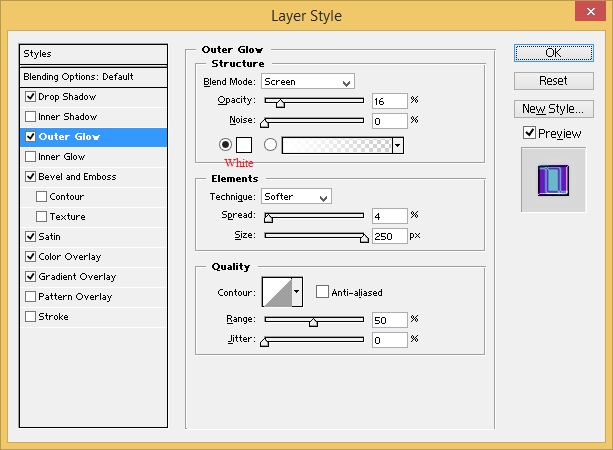
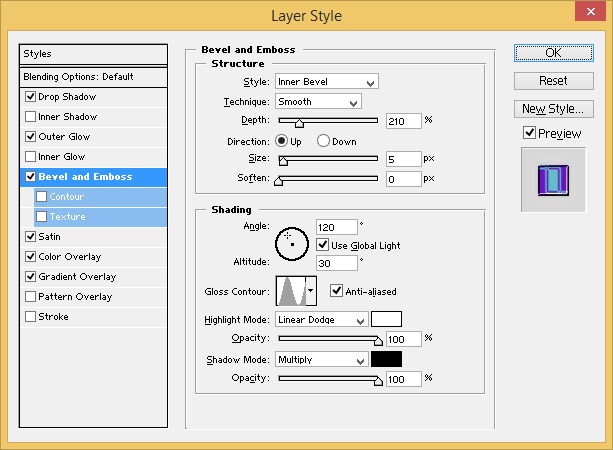
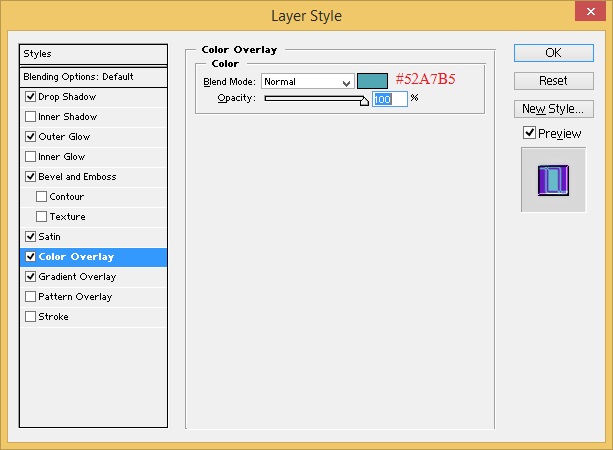
Add the following layer styles to one of the shapes. Then just copy the layer style from the shape and paste it on the rest of your shapes to save time. If you wish to reduce the scratches behind the lights, just select the "Metal Scratches" layer and run the Eraser (E) along the lights.

After

Once you're satisfied with the results, it's time to add the neon lights. Select the Shape Tool (U) and pick the Rounded Rectangle. Set the corner radius to 2px and draw this shape somewhere inside the long parts letters, making sure it is half the width of the area you're placing it. And make sure not to cover the ends of the letters, as we still need to add screws there.

Add the following layer styles to one of the shapes. Then just copy the layer style from the shape and paste it on the rest of your shapes to save time. If you wish to reduce the scratches behind the lights, just select the "Metal Scratches" layer and run the Eraser (E) along the lights.

After

Step 5


Step 6


Step 6
Now to add the Screws. Since there is no brush for screw heads, we need to make our own brush for this. Create a new layer and draw a black sphere shape. Duplicate that shape and squeeze it sideways, change its color to grey, duplicate it again and rotate it 90 degrees.Now merge the 3 shapes and Cmd/Ctrl + Click the layer it created to place a marquee around the screw head. With that selected, go to Edit > Define Brush Preset. Name the new brush "Screw Head". After that, You may remove the layer with the Screw Head.
Now to add the Screws. Since there is no brush for screw heads, we need to make our own brush for this. Create a new layer and draw a black sphere shape. Duplicate that shape and squeeze it sideways, change its color to grey, duplicate it again and rotate it 90 degrees.
Now merge the 3 shapes and Cmd/Ctrl + Click the layer it created to place a marquee around the screw head. With that selected, go to Edit > Define Brush Preset. Name the new brush "Screw Head". After that, You may remove the layer with the Screw Head.
Step 7
Create a new layer and call it "Screws". Next, apply these layer styles to the "Screws" layer.


Now pick the brush You've just created, change the size to 10px, and with the "Screws" Layer selected, click on the ends of each letter, or where ever You want to place a screw.
Create a new layer and call it "Screws". Next, apply these layer styles to the "Screws" layer.


Now pick the brush You've just created, change the size to 10px, and with the "Screws" Layer selected, click on the ends of each letter, or where ever You want to place a screw.
Post a Comment
0 comments
Dear readers, after reading the Content please ask for advice and to provide constructive feedback Please Write Relevant Comment with Polite Language.Your comments inspired me to continue blogging. Your opinion much more valuable to me. Thank you.